Add a twist to Rowan Felted Tweed knits with Felted Tweed Colour! Topaz by Georgia Farrell

Oo-weee, a lot of people have used Rowan Felted Tweed at some point. In fact, you may be one of the knitters behind the 39,904 projects I currently see on Ravelry using it, wow! And probably, if I were to tally all the Rowan designs by "yarn used", Felted Tweed would rank very high in pattern number... if not first. The Rowan Fall/Winter Magazine always seems to have designs for the yarn, which is exciting when you get it in the mail and have a robust FT stash lying in wait. Here's a favorite design from Marie Wallin that I've made from Rowan Magazine 54:
 |
| Anatolia by Marie Wallin (you need to find the Mag) |
The color palette for Felted Tweed has steadily ramped up, too. I haven't blogged about this one yet, but here's a recent Kaffe Fassett shawl I made on the knitting machine that used a ton of very vibrant colors he designed for the line:
 |
| Zig Zag Wrap by Kaffe Fassett ($7) |
So... what would happen to the look of these designs, all of the myriad Felted Tweed designs that exist (here's a search on Ravelry!), if there were a color gradient version? Yep, that's what Felted Tweed Colour is. It's the same yardage and make-up of the original yarn, but with a slow, tonal, gradient vibe.
 |
| I used shade Frost 025 |

It opens up a ton of possibilities, especially when it comes to doing "faux supercolorwork", as I like to call it. Instead of using 10 shades of yarn to create a fairisle design, you can cut down by half by using only one, color-changing background color. Here's a Felted Tweed Colour Collection that highlights that possibility, especially in this scarf pattern that only uses two shades!
 |
| Jade by Lisa Richardson ($7) |
This new yarn was released simultaneously with Rowan Magazine 70, where I spied this cute top in regular Felted Tweed with some fun embroidery, called Topaz by Georgia Farrell:

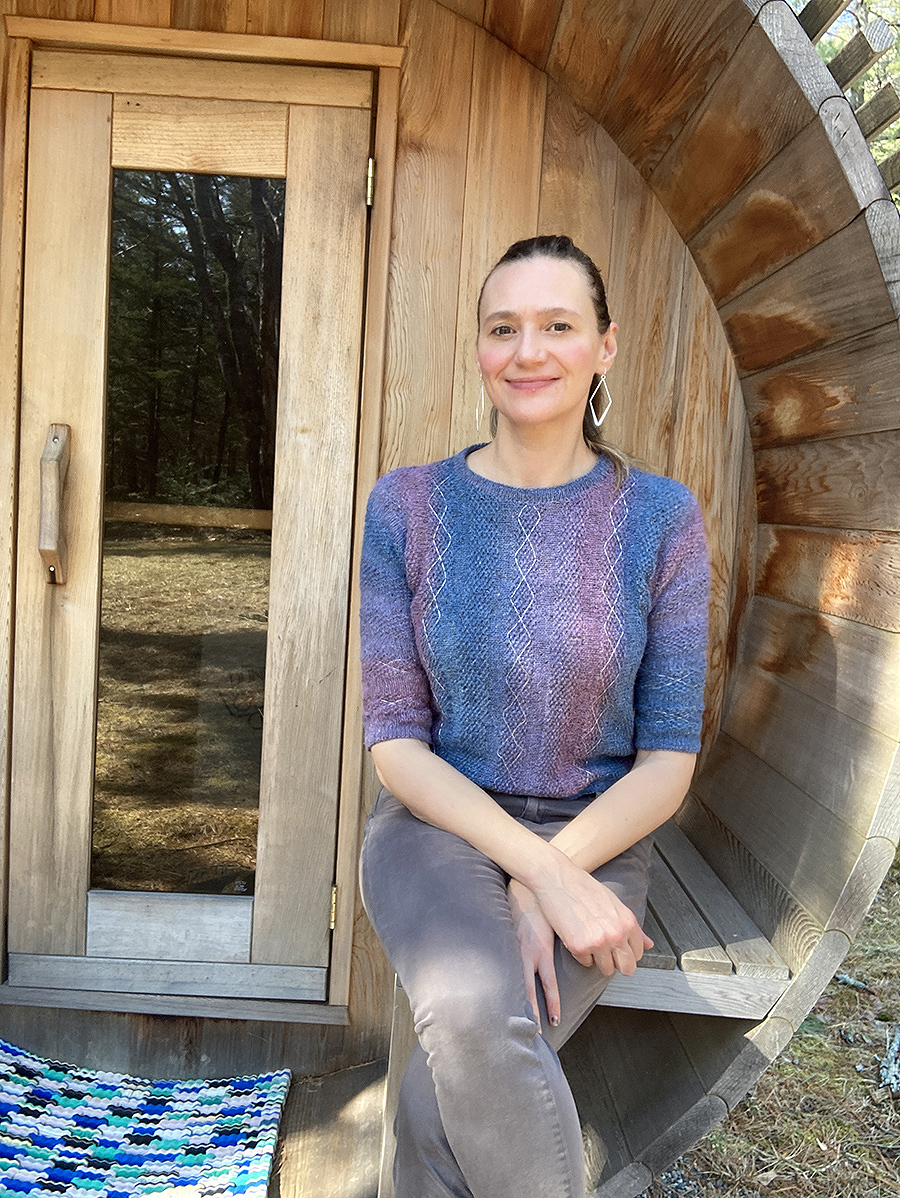
I wondered how this design might work in Felted Tweed Colour, and embarked on a side to side knitting (and color matching) adventure.

As you can see, the top is made in one piece from sleeve to sleeve, integrating hole shaping for your noggin. The shoulders are cleverly made with double decreases towards the back of the neckline. After knitting, you fold the piece together to sew the side and sleeve seams:

As can be expected with me, the slow color-changing gradient brought me quickly into obsessive Noro territory. When you get to the neck hole, you break off your yarn AND the number of stitches cuts nearly in half. This immediately changes the periodicity of the color and I did a lot of pulling color and matching color to twin the front and back. Here's a video I made of how I do this.
In retrospect, it didn't matter at all. You would never see this meticulous match unless you were a drone!


After sewing the seams, you finish off the body hem and neckline by picking up stitches and knitting perpendicular to the main body in a neat, folded stockinette band.

The top is definitely a cropped design, but you have two options for lengthening it. First, you could knit a much longer bottom hem. Second, after finishing the first sleeve, you could just increase the number of stitches that are cast-on to create the body. I'd add a skein to the requirements for any lengthening additions you make, especially if you are trying to color match.

Now for the final touch, the embroidery! Obviously, you don't have to do this part if you don't want to. And I have to admit, it is rather tricky. The pattern uses metallic DMC Diamant thread that comes in some great colors. It is quite a thick embroidery thread. To be able to see it against yarn, I wouldn't recommend substituting with any of the thinner metallics you commonly find.
For the effect, you run the embroidery thread over the moss stitch stripes, crossing through the purl bumps to create a diamond pattern. This wasn't trivial, as I found that the direction you pass the yarn through the bumps (left or right, up or down) does influence how each diamond forms.

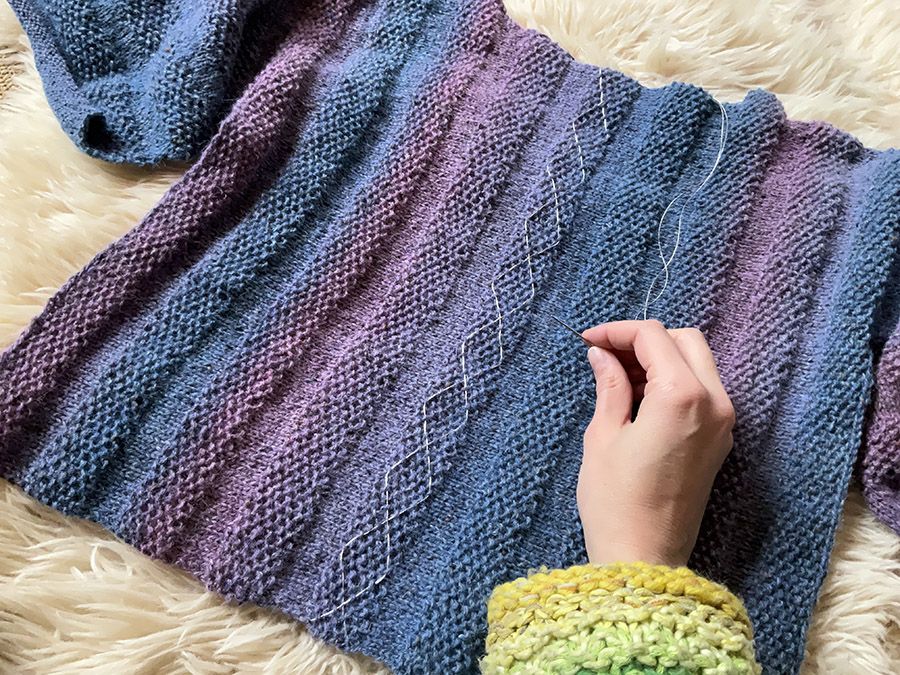
To get the diamonds perfect, you would need to pull the strands tightly -- BUT DON'T DO IT! Because it's a running stitch, if you pull one end, the other end will end up gathering. This means a croppier crop than you intended! And tightness. My advice is to try a column a few times, tug to get the diamonds looking alright -- but shy of perfection. That will actually be more perfect than you think, in the end.
There are only 4 columns on the body and two on each sleeve, so it's not too onerous. I used two strands per stripe (it was too difficult to use just one and loop it back) and if a stripe was continuous from front to back, I could do it all at once. I love what the embroidery adds to the piece, personally.
And I can't believe I had earrings to match!


See my Topaz on Ravelry
In personal news, you may have noticed I had stepped back from blogging in preference of social media. Now I am flipping my views. I ended up not telling anyone very much about what I was making and I feel like the enrichment that I get out of finding new ways to improve my knits was disappearing into the ether. So, I'm starting up again! I've got some older knits I'll be putting up. You'll see me without aging spots, less wrinkles, short hair, long hair, blonde hair... it should be rather amusing. If you'd like to subscribe for new post notifications, just scroll up to the top of the page.
And yes, I still live in Bar Harbor, Maine, I still have room (though less) in my closet for knits, and I now own four knitting machines. Hee hee, living the crafting life. Well, at least when I'm not at work, ha!
XO,
Dayana Knits


I’ve always enjoyed your blog and I’m happy to see you back in this form.
ReplyDeleteYes, I love your blog entries!
ReplyDeleteWelcome back! As an avid knitter I enjoy blogs where the knitter goes into depth about their processes and projects. Yours is a favorite. Thanks for posting and I hope it doesn't cut into knitting time too much! (by the way, my blog hasn't been updated for a very long time but I had to add it in order to post!)
ReplyDeleteThat is a gorgeous sweater! I love the metallic embroidery- it really adds to the project. Thank you so much for sharing your process!
ReplyDeleteSo glad you are back to blogging. I have learned a lot from your posts and enjoy the beautiful knits and photos.
ReplyDeleteI am happy to see you back to blogging, I always enjoyed reading about your yarn adventures! Thank you!
ReplyDeleteVibrant blue
ReplyDeleteThank you for writing such an enjoyable article. It was a pleasure to read!
ReplyDelete