How To Frankenstein Patterns for the Exact Shape You Want


How many times have you looked at a pattern and said:
"I wish that had set-in sleeves!"
"I wish that was for a different weight yarn."
"Can I change the collar?"Have no fear, you can have all those things and more by Frankenstein-ing a pattern with another one that has the elements you want! Here's how I do it.
This is the original La Boheme by Marie Wallin from Rowan Magazine 54, and you can see that I wanted to change a lot. 😅

Some of you are probably saying, "ugh, nice pattern but that's too much to change." Yeah, I get you -- but I was head over heels for this colorwork motif (though you can barely see it with their color choices!) and I dared myself to make it work. This was an acceptable way to be a wallflower!

Couldn't I just keep the parts of the pattern I wanted (colorwork body, solid sleeves) and fit those elements into a different pattern that worked better for my body type?
I went through my closet and thought back on patterns that had the set-in sleeves, waist shaping and neckline that I wanted, and my Wharf by Gemma Atkinson stood out.

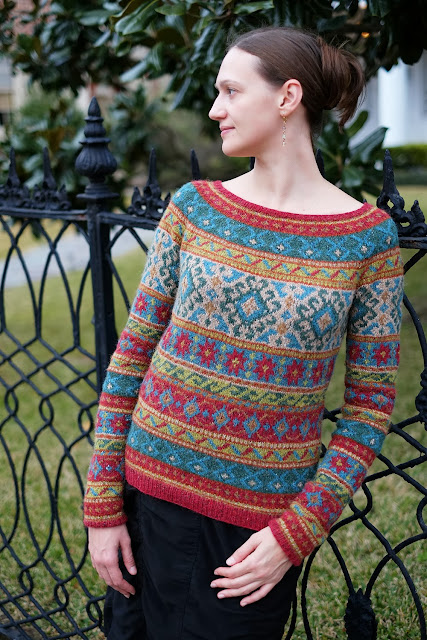
The tricky part was going to be matching the stitch and row gauge between La Boheme and Wharf. The first step was to knit my colorwork swatch using the -- can I say amazing -- yarns that I chose for a HIGH-CONTRAST version of La Boheme. Do you see the sparkle?


The original pattern uses a main color of Rowan Kidsilk Haze and Rowan Fine Lace held together, and a contrast color of Kidsilk Haze and Anchor Artiste Metallic held together. I thought -- why not just use the sparkly Rowan Kidsilk Haze Eclipse instead of trying to find this crazy metallic stuff? Then I got a little greedy for tonality and added a strand of Madeline Tosh Merino Light in Hickory. (See the details in my Ravelry project.)

One thing you should remember about stranded colorwork is that the gauge comes out very nearly square. This is very different from a regular stockinette garment (like my Wharf template pattern) which always has more rows than stitches per inch.
My colorwork gauge was 28 stitches x 28 rows.
My Wharf template gauge was 28 stitches x 36 rows.
Hey -- I was halfway there! The lore of knitting says that your stitch gauge is much more critical than your row gauge. This is because you usually knit to a certain length no matter what, and if you need more rows to get there, no big deal just keep knitting. I get wary of that lore, though, when it comes to any shaping over a certain number of rows, like set-in sleeves or waist shaping. Take a sleeve hole for example. If you followed the 36 row gauge pattern when you had a 28 row gauge, then it would take more length to finish your sleeve shaping, and your underarm might be too tight!
FRANKENSTEIN #1, WIDTH:
I could now follow my Wharf template pattern exactly for the body, sleeve and neckline widths. Yay!
FRANKENSTEIN #2, LENGTH:
I thought -- why don't I just find another simple pattern that matches my 28 row gauge so I could get the right cadence to my shaping? I started flipping through my pattern books and discovered Trinity by Lisa Richardson with a gauge of 17 stitches x 28 rows!

I was armed and ready to start the body. Every time there was a stitch count to follow, I used Wharf, and every time there was shaping over rows, I used Trinity.


Like most Rowan patterns, the front and back colorwork motifs are knit flat and sewn. To convert to "in-the-round", I simply stayed with my Wharf stitch count but repeated the motif on the front and back with a faux seam made of two solid stitches. This is important to hide the obvious colorwork jog that occurs while knitting in-the-round.


To omit having to follow any pattern at all for the sleeves (I was tired, ya know?), I used my trusted pick-up-stitches and knit-downwards in-the-round slim sleeve formula. This must be the 8th time I've used this formula and it works perfectly every time.


The collar is one of my favorite styles, and I originally discovered it in the Wharf pattern. You simply take a smaller needle and knit 10 rows in reverse stockinette (or just pick up stitches from the wrong side and knit stockinette). It makes a neat little "roll" toward your skin that it quite beautiful.


Instead of adding that long ribbing on the sleeves as in the original La Boheme pattern, I mimicked the collar for the cuffs -- the first time I've ever done that. I like it!

I couldn't be happier with this knit. It's super-warm, sparkly and proof that you can take the idea of a knitting pattern but use another pattern to make it work better for you.
So, what are you waiting for? Start keeping a log of the patterns that have the perfect sleeves, waists, collars or hems and save them for your future Frankenstein!
See my High-Contrast Boheme on Ravelry

Get my blog posts by e-mail!


Dayana, this is gorgeous! Thank you for the excellent notes on how to Frankenstein the pattern.
ReplyDeleteThank you Kelly! I know a designer would say “ just calculate a new pattern” but I’m just not that type of creature. 😁
DeleteThis is great!
ReplyDeleteI have to admit, when I saw the title I was thinking this was more of a book than a blog post (cap sleeves to set-in - just say NO!), but I love the way you did it. I never would have thought of matching the row gauge for decreases either.
Ha -- it's true, there are certainly whole books on set-in sleeve conversion! I've seen a million calculators and designing chapters, but I always just think -- um, can't I just use something that's been done already?!
DeleteI'm jumping up and down applauding! A sensational success!
ReplyDelete-- Gretchen (aka stashdragon)
Thank you, my lady!
DeleteWow, you took that pattern and really made it your own! Your chosen contrast colors, the set-in sleeves, and the neckline and waist shaping all brought the original Boheme pattern to a whole new, gorgeous level.
ReplyDeleteThank you Mary, I'm so pleased that it WORKED OUT!
Delete