Little Green Riding Hood - A New M1 Stitch and How To Nupp Loosely
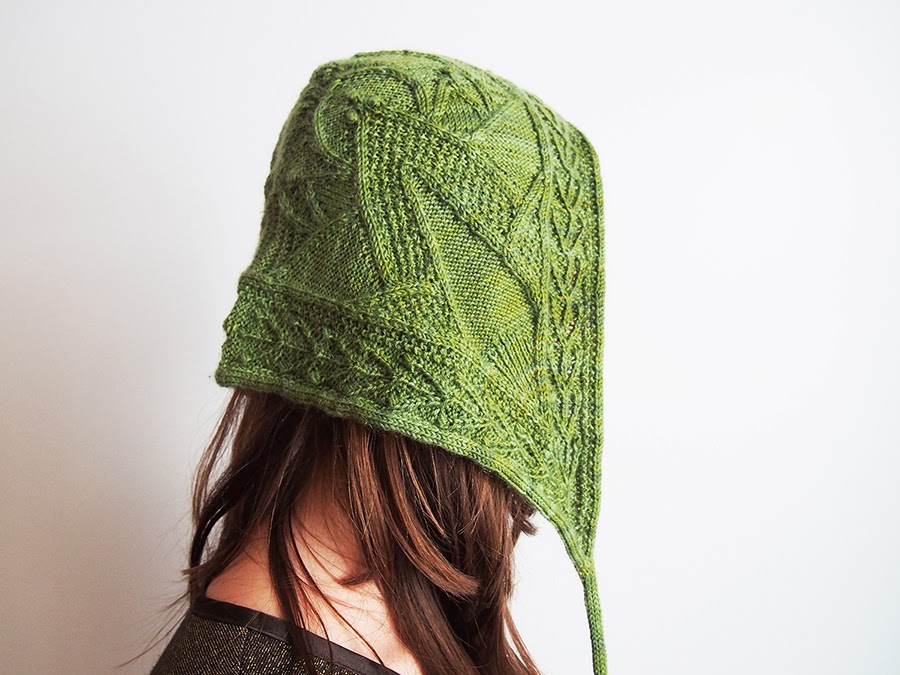


When a designer has an interim name for their pattern called 'Christa's Crazy Complex Hood', I know they designed it for people like me. I don't even need a hood; I'm not even sure how to wear one. But when someone says a pattern is challenging? I need to do it to prove I can.

This is the Lawsonia Hood by Christa Giles. It was just published in this season's issue of Twist Collective Winter 2013. See the cardigan I knit by Christa Giles in this blog post.

It comes in two sizes, that are simply the result of changing yarn weight and needle size. I like replicating official photos, heh heh.

I have a chick-pea head, so I chose small and one of the new tonal shades of Rowan Fine Art that just came out. This is Hornbeam. Can I say how happy I am that this really great sock yarn now comes in non-variegated colors?!

Although, I did have fun using Raven in my Fine Art Tee. Read my review of this really fantastic yarn here.

On Ravelry, I call this hood "Everything But the Kitchen Sink". It has cables, cable pictures (as in, not predictable), nupps, bobbles, twisted stitches, moss stitch, novel increases, short rows, and knit and purl grafting of the two halves up the center.


I especially love the ends of the i-cord ties.


As I've mentioned before, I always learn things from Christa's patterns. This post will be method-heavy so I can show you:
- A better type of M1 (make 1) increase, done over two rows.
- The difference between a tight 5-stitch bobble and a loose 5-stitch nupp.
1. I want to show you the details of the M1 stitch over two rows, as I think it is really a helpful stitch. You may have noticed that a M1 usually tightens the stitches to either side of it. This is because the M1 must use yarn from adjacent stitches to be created, and this can distort tension.
To avoid this, the pattern does the M1 stitch over 2 rows. Basically, the first row makes the yarnover in the right direction to supply the yarn, and the second row knits it.
To do the M1L, slip your index finger under the working yarn.

Pull the loop up and insert the needle into the back loop, from back to front:


When you come to the loop on the reverse side, work it through the front.


To do the M1R, slip your index finger over the working yarn instead of under.

Make a loop by bringing your index finger towards you. (You may recognize this as the same loop made with a backwards loop cast-on.) It's a bit awkward but it should look like this:
When you come to the loop on the reverse side, work it through the front.
To do the M1R, slip your index finger over the working yarn instead of under.
Make a loop by bringing your index finger towards you. (You may recognize this as the same loop made with a backwards loop cast-on.) It's a bit awkward but it should look like this:

Insert the needle through the front loop, from front to back.


When you come to this loop on the other side, work it through the back. You'll know it because it's way easier to do than the front loop.


I LOVE THIS TECHNIQUE! I'm definitely using it in the future. I had already discovered that the only way to do an accurate top-down sleeve of a bottom-up pattern was to do M1s over two rows, BUT, I never thought to turn the yarnover in a left or right direction accordingly.


2. Have any of you ever done nupps? It's a lovely Estonian shawl stitch that is related to the bobble.
While both the bobble and the nupp are made by increasing many stitches into one stitch, the similarity stops there.
Bobbles are increased then decreased over several short rows. If you want a good bobble, make it tight.
Nupps are increased all at once and then purled all at once on the next row. If you want a good nupp, make it loose, or you will be driven insane. It will be simply impossible to work the stitches on the way back.
I failed to do this in my Valentina wings shawl as I wanted 9-stitch nupps (crazy) and had to use a crochet hook to force myself to make a loose enough nupp.
Peppercorn knits has a good technique described here. But I just HATE to pick up another tool while knitting.
 |
| Quatrefoil Lace Scarf pattern by Natalia Blank |
While both the bobble and the nupp are made by increasing many stitches into one stitch, the similarity stops there.
Bobbles are increased then decreased over several short rows. If you want a good bobble, make it tight.
Nupps are increased all at once and then purled all at once on the next row. If you want a good nupp, make it loose, or you will be driven insane. It will be simply impossible to work the stitches on the way back.
I failed to do this in my Valentina wings shawl as I wanted 9-stitch nupps (crazy) and had to use a crochet hook to force myself to make a loose enough nupp.
 |
| My Valentina Wings on Ravelry |
Peppercorn knits has a good technique described here. But I just HATE to pick up another tool while knitting.
Both the bobbles and the nupps are worked to 5 stitches max. You do a (K1, yo, K1, yo, K1) in a stitch for both. So, here is the lesson, for bobbles, go tight!

For nupps, go loose!!! I did loose yarnovers and always pulled at the needle for slack. It should look like this:

For nupps, go loose!!! I did loose yarnovers and always pulled at the needle for slack. It should look like this:
A note on the bobble technique in this pattern. Instead of purling rows, you just transfer the stitches over and pull the yarn across the back really tightly, like an i-cord. This makes a nice tight bobble, trust me.
 |
| Nupps in action |
I've been experimenting with how to wear something like this.

It's not quite an earflap hat, as it's not really tight around the head... but it has "earflaps" that really keep your ears warm.

The truth is that my major winter coats don't have a lot of room for hats under the hood. Montreal has a serious hood culture, you don't survive without a hood.


It's not quite an earflap hat, as it's not really tight around the head... but it has "earflaps" that really keep your ears warm.
The truth is that my major winter coats don't have a lot of room for hats under the hood. Montreal has a serious hood culture, you don't survive without a hood.

As for the fit... I wouldn't trust my sizing here. I told you I did a size small (using fingering weight yarn and US 1 (2.5mm) needles). Weeeell, I should have swatched and used a US 0, probably. The hood came out significantly larger than the small dimensions.... this ended up being ok for me, but I would suggest a gauge swatch, no matter how annoying.
-----
On a different note, THANK YOU ALL FOR THE BIRTHDAY WISHES, I MADE IT TO 1000 LIKES ON MY FB PAGE! :) I have a brand new camera for my 36th birthday, and I've never ever had a nice camera. The truth is that I've had it for a couple of months, and I've been using it in all the photography in the last few posts. I highly recommend it for those who would like a compact fixed lens (non-SLR/reflex) camera. I'll be replacing the zoom lens with a 17mm/f1.8 ultra-bright wide-angle lens... omg I can't wait until it arrives next week! Let's see if it makes a difference for the next post! I'll make sure I do all my photos on a dreary, dark day, lol.

See my Everything But the Kitchen Sink on Ravelry


Wonderful, wonderful work. On the hood, on the explanations of techniques, and on the photographs!
ReplyDeleteWhy, thank you, I'm so pleased!
DeleteSpectacular...I love it under the hood! It would be like a secret until you dropped the hood...then wow!
ReplyDeleteGreat point, I love hidden beauty! I remember once learning that during a certain era in Japan, wealthy people were forced to hide their gorgeous silks and embroidery on the inside of the kimono, which only the family would be able to see...
DeleteI think your green hat is better than the original red one. It looks like the right size to me and very art nouveau. I'm aiming to knit more challenging patterns next year. Great photos...they must have taken forever!
ReplyDeleteThanks! I get a historical vibe when I wear it... I feel unique to all the pom pom hats surrounding me. Ahh, the photos didn't take long per se, because I just click and click and click. What takes FOREVER is choosing one that I like best... hours and hours!
DeleteGorgeous work. Spectacular post!
ReplyDeleteThanks so much, Fran! Do come back sometime. ;)
DeleteI love that hood, but I am physically incapable of knitting tight enough to get the pattern gauge of 11 st/inch, so it will never happen for me. Instead I'll just admire yours!
ReplyDeleteYou know what? I couldn't get there either! (although I didn't really try). I only got 9sts/inch, oh well. :)
DeleteThis is a wonderful post, Dayana. Beautiful and informative. In the first photo, the design on the side of the cap reminds me of the snow angels my kids used to make in the snow! I love the I-cord ties; so pretty!
ReplyDeleteThank you so much! Yes, it's the first thing I thought... a snow angel or an angel on top of the Christmas tree.
Deletewow, you had me at those adorable little leafy icord ties! your choice of colorway really suits these little details. :]
ReplyDeletealso!!! I don't have an epl5 but i have had an epl2 for about a year and a half now and am in love with it!
DeleteM1 over two rows! Revelation! I had thought my M1s just weren't that awesome due to my inexperience (which is perhaps indeed the case!) so I will definitely be trying this technique next time.
ReplyDeleteDayana, your Hood is STUNNING to say the least! Thank you for sharing it. Like you, I am challenged NOT to knit a challenge, so this Hood will go in my queue.
ReplyDeleteThank you for your thorough explanation and photos of how to knit better M1's also. Presently, I am designing a piece that requires invisible increases and naturally I turned to M1 WITHOUT dropping the 'bar'. I still didn't like the way they are coming out (too tight) and was about to scratch my head raw in an attempt to loosen up the stitch. You have saved me, my scalp, and my design. Thank you so much!
And to think I only came to your page to see your work...
Enjoy your new(ish) camera!
MJ
I am so happy that this could be helpful for your design! The camera has changed my knitting/blogging life, :).
ReplyDelete